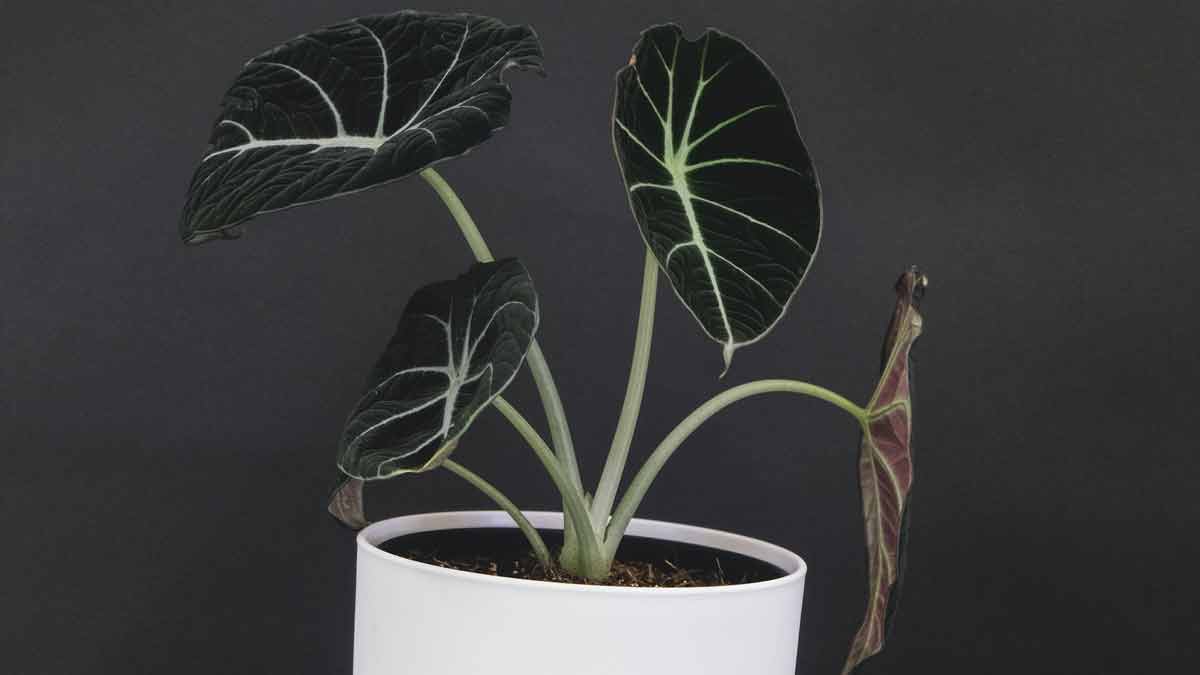
Overwatering can cause root rot or fungal infection in Alocasia, leading to brown or black spots on leaves. Signs include drooping leaves, wet soil, and foul odor. To save an overwatered plant, allow the soil to dry before watering and remove affected leaves. Avoid watering too frequently and use well-draining soil.
Overwatering is a common issue that can harm your Alocasia plants.
Recognizing and addressing the problem early on is essential to restore them to their vibrant, healthy state.
In this guide, we’ll walk you through the signs of an overwatered Alocasia and provide practical tips for fixing it.
Signs Of Overwatering In Alocasia Plants
Overwatering can be a common issue for Alocasia plant owners, leading to a range of unwanted symptoms that can damage the health and appearance of the plant.
Symptoms can include yellowing of leaves, root rot, wilting, mold or fungus growth, and soil that doesn’t dry out.
Identifying these signs of overwatering is crucial to maintaining the health of your Alocasia plants and preventing further damage.
Yellowing Of Leaves
One of the most prominent indicators of excessive watering in an Alocasia plant is the yellowing of its foliage.
This occurs because excess water can suffocate the plant’s roots, depriving them of oxygen and causing a halt in essential nutrient uptake.
For example, if you own an Alocasia polly – particularly susceptible to yellowing due to overwatering – you might notice that the bright green leaves begin turning pale and eventually develop brown spots or patches.
In such cases, acting quickly and adjusting your watering schedule is crucial so your beloved tropical plant can return from this issue.
Root Rot
Root rot is a common issue that plagues overwatered Alocasia plants, causing significant damage to the plant’s vital root system.
It occurs when excess water suffocates the roots, creating an environment conducive for harmful fungi and bacteria to thrive.
Early detection of root rot can help salvage your Alocasia from severe consequences.
Healthy roots should appear firm and white and carry a fresh earthy smell, while affected ones emit a foul odor due to decomposition.
When root rot has taken hold of your plant severely, you may need to trim away damaged roots with sterile pruning shears before repotting it using fresh soil mix with adequate drainage capabilities.
Wilting
Wilting is a common symptom of an overwatered Alocasia plant, as excess moisture in the soil can lead to root rot and hinder their ability to absorb essential nutrients.
When roots become stressed or damaged due to prolonged exposure to waterlogged conditions, they cannot transport water effectively throughout the plant.
Imagine watering your Alocasia daily without considering humidity levels and drainage capabilities.
This could cause your plant’s root system to weaken, leading to wilting leaves that lack vigor.
Mold Or Fungus Growth
If you notice mold or fungus growth on your Alocasia plant, it is likely a sign of overwatering.
Excess moisture in the soil can create a breeding ground for these types of problems.
If left untreated, it can lead to root rot and ultimately kill the plant.
To fix this issue, stop watering immediately and check the roots for any signs of damage or decay.
It’s best to repot your plant into fresh soil that drains well.
It’s essential to note that prevention is key regarding mold or fungus growth on plants like Alocasias.
To avoid overwatering, ensure only to water when the soil is dry, and always use well-draining soil mixtures in pots without saucers or trays underneath them.
Additionally, pay attention to humidity levels around your plant and ensure proper drainage at all times since excess moisture can cause issues even if you aren’t actively watering too much.
Soil That Doesn’t Dry Out
Consistently wet soil is a common sign of overwatering in Alocasia plants, and it can lead to root rot if not addressed promptly.
If the soil in your plant’s pot doesn’t dry out between watering sessions, it could indicate that the potting mix isn’t well-draining enough.
Excess water may accumulate at the bottom of the pot, preventing oxygen from reaching the roots and causing them to suffocate.
To avoid this issue, use a high-quality soil mix containing perlite or vermiculite to improve drainage.
How To Fix An Overwatered Alocasia
Alocasias are popular houseplants known for their striking foliage and ease of care, but overwatering can be a common problem that can cause irreversible damage.
Here we’ll explore how to fix an overwatered Alocasia, providing step-by-step instructions to restore your plant to its former health.
From identifying the signs of overwatering to repotting with fresh soil, this guide offers practical tips and advice to help your Alocasia thrive again.
1. Stop Watering Immediately
If you suspect your Alocasia plant is overwatered, the first step in fixing the problem is to stop watering it immediately.
This may seem obvious, but it’s essential to prevent further damage to the roots and leaves of your plant.
Excess water can cause root rot, which can be fatal for Alocasia plants if left unchecked.
Once you’ve stopped watering your plant, allow the soil to dry out completely before watering it again.
You can test the soil moisture level by inserting your finger into the soil up to an inch deep – if it feels moist or wet, wait a few days before checking again.
2. Check The Roots For Damage
One of the best ways to identify and fix an overwatered Alocasia is by checking the roots for damage.
Root rot can be a severe issue in Alocasia plants, so it’s essential to act promptly if signs are present.
To check for root damage, gently remove your plant from its pot and examine the roots.
Healthy roots should be white, while damaged ones may appear black or brown and feel mushy.
It’s also crucial to ensure that your new pot has proper drainage holes since poor drainage can promote fungal growth leading to root rot even after repotting.
3. Repot Your Plant
If you’ve identified signs of overwatering in your Alocasia plant and checked the roots for damage, it may be time to repot your plant.
Choose a pot that is slightly larger than the current one and has drainage holes to allow excess water to escape.
Carefully remove your plant from its old pot, gently loosening tangled roots.
Trim away any brown or mushy roots and set aside healthy ones.
Place your plant in the new pot, ensuring that the top of the root system sits at the soil level.
Remember to give your newly repotted Alocasia time to adjust in a bright indirect light spot before watering it again.
4. Give Your Plant Time To Recover
After repotted and checked for damage, letting your plant recover is important.
Your overwatered Alocasia may not immediately bounce back, but with patience and proper care, it will eventually thrive again.
It’s also important to note that different types of Alocasia plants may have varying recovery times.
For example, Alocasia Polly plants may take longer to recover than other varieties due to their sensitive roots.
However, your Alocasia should show signs of improvement within a few weeks by providing a consistent environment with appropriate lighting and humidity levels.
Alocasia Care Tips To Avoid Overwatering
Alocasia plants are a stunning addition to any indoor garden, with their striking foliage and unique shape.
However, caring for these plants requires some attention to detail, especially when it comes to watering.
Here we’ll explore some essential tips to help you avoid overwatering your Alocasia and ensure that it stays healthy and vibrant.
From soil mix to humidity levels, we’ll cover everything you need to know to keep your Alocasia thriving for years.
1. Water Only When The Soil Is Dry
One of the most important factors in preventing overwatering is to water your Alocasia only when the soil is dry.
As mentioned earlier, these plants require consistent conditions, and watering them too frequently can lead to root rot and other issues.
To ensure you are not overwatering your plant, check the top 2-3 inches of soil by inserting a finger or a moisture meter.
It’s also essential to consider environmental factors such as humidity levels and sunlight exposure as they affect your Alocasia watering needs.
If your Alocasia is located in a spot with high humidity or indirect sunlight, it may need less water than one receiving direct sunlight or placed near an air conditioning vent that dries out its potting soil faster.
2. Ensure Proper Drainage
Proper drainage is imperative to maintain the health of your Alocasia plant.
The roots need oxygen, which they only receive when excess water drains from the pot.
If you’re repotting your Alocasia, add pebbles or some material to ensure proper drainage at the bottom of the new pot.
If you notice that water is not draining properly from your current pot, it may be time for an upgrade.
Potting soil should also be well-draining; adding sand or perlite helps.
Overwatering occurs when water cannot escape through proper channels leading to root rot and other issues causing damage to leaves and ultimately killing plants in certain circumstances.
3. Use A Well-draining Soil Mix
One crucial aspect of Alocasia care is using a well-draining soil mix to prevent overwatering.
When the potting soil retains too much water, it can lead to root rot and other harmful conditions for your plant.
To create the ideal growing environment for your Alocasia, consider mixing a high-quality potting soil with coco peat or mossy peat.
Another essential tip is to avoid saucers or trays under your Alocasia’s pot, as these can trap excess water and contribute to overwatering.
4. Pay Attention To Humidity Levels
Aside from proper watering practices, paying attention to humidity levels is crucial for Alocasia care.
These tropical plants thrive in high-humidity environments found in their natural habitat in tropical rainforests.
You can increase the humidity level around your Alocasia by using a humidifier or placing a water tray near it.
Misting the leaves regularly with room temperature water can also help maintain their moisture level.
On the other hand, excessively low indoor air moisture levels can cause problems like dry or curling leaves and slow growth.
Remember that healthy roots require adequate soil moisture and high humidity levels to thrive, but ensure not to overdo it since excess moisture leads to root rot or fungal infections.
5. Don’t Use Saucers Or Trays Under The Pot
Using saucers or trays under the pot of an Alocasia plant might seem like a good way to catch excess water, but it can lead to overwatering.
The problem with saucers is that they hold onto the water and prevent proper drainage, causing the soil to remain too wet for too long.
Try using humidity bowls or trays instead of saucers to avoid this problem.
These keep air moisture high around your Alocasia without holding onto excess water in the soil.
If you need to use a saucer due to indoor decor considerations, ensure it’s emptied regularly so as not to leave standing water underneath your pot.
Final Thoughts
Identifying and fixing an overwatered Alocasia is crucial to your plant’s health.
By paying attention to signs such as yellowing leaves, root rot, or mold growth, you can take the necessary steps to save your beloved tropical plant.
Remember to reduce watering immediately and check for damaged roots before repotting in well-draining soil.
These easy steps will allow your Alocasia to recover and thrive in the right conditions.
Additionally, incorporating simple care tips like maintaining proper humidity levels and using self-watering pots with drainage holes can prevent overwatering issues from occurring in the future.
Related Content
 How To Save an Alocasia From Root Rot (A Complete Guide)
 Why Is My Alocasia Dripping Water? (An Easy Guide)
 How Often Should You Water Alocasia Plants (An Easy Guide)
 How to Properly Prune Your Alocasia Plant (A Complete Guide)
 Growing Alocasia in Water: A Complete Propagation Guide
 Why Are My Alocasia Leaves Curling? (10 Solutions)