Key Takeaways
- Recognize the signs that your rhododendron plant needs repotting, such as roots growing out of the pot, slow growth, yellowing leaves, or wilting.
- Choose a pot slightly larger than the current one and use a high-quality acidic soil mix suitable for acid-loving plants like rhododendrons.
- Prune the roots during repotting to promote healthy growth and prevent root-bound plants.
- Proper drainage is crucial to ensure the optimal health of your rhododendron plant before and after repotting. Avoid overwatering, provide nutrients as needed, protect from frost and other elements, and monitor its progress closely.
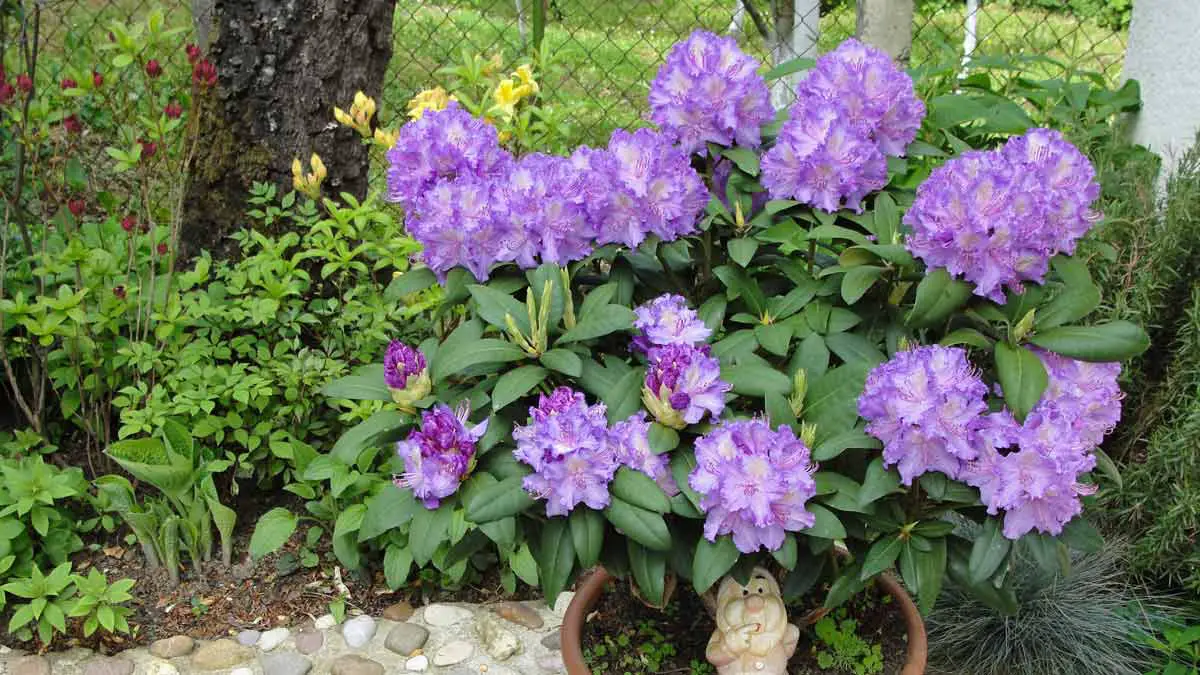
Rhododendrons are well-loved, acid-loving plants known for their vibrant blooms and lush foliage, making them a favorite addition to gardens worldwide.
However, even the most beautiful and hardy shrubs may require repotting as they grow and mature.
This guide will provide a clear step-by-step process to repot your rhododendron plant.
We will cover crucial tips on when to repot, the tools required, selecting the appropriate pot and soil mix, methods of transplanting, and common errors to avoid.
By following these expert guidelines closely, you can ensure your beloved plant enjoys optimal health in its new home.
When To Repot Your Rhododendron Plant
If you suspect your rhododendron plant needs to be repotted, keep an eye out for any indications, such as roots protruding from the bottom or sides of the container, stunted growth, leaves turning yellow, or wilting.
You should repot the plant in early spring, before the emergence of new growth.
Signs That Your Plant Needs Repotting
Recognizing the signs that your rhododendron plant needs repotting is crucial for maintaining its overall health and vitality.
One clear indication is when you notice roots protruding from the drainage holes at the bottom of the pot.
Another sign to look out for is if your Rhododendron starts wilting or shedding leaves even when adequately watered and fertilized.
This can indicate that the roots are too compressed, limiting their ability to take up essential nutrients and moisture effectively.
Best Time To Repot
The ideal time to repot your rhododendron plant is early spring or fall.
This allows the roots ample opportunity to establish themselves before extreme weather conditions.
For instance, if you choose to repot your Rhododendron in early spring, this can help ensure that its shallow root system has sufficient time to adjust and recover from any potential transplant shock ahead of the growing season.
Additionally, consider applying fertilizer explicitly designed for acid-loving plants like rhododendrons during late winter or early spring.
This will help provide essential nutrients for healthy growth and vibrant flowering throughout the year.
Preparing To Repot Your Rhododendron Plant
It is important to ensure a successful Rhododendron repotting process, gathering the necessary tools and materials, choosing the appropriate pot and soil, and preparing them correctly.
Read on to learn more about these essential preparatory tasks.
Gathering Necessary Tools And Materials
Before beginning the repotting process, ensure you have all the necessary tools and materials to make the task efficient and successful.
Here’s a list of the essentials:
- Pruning shears: For trimming unruly roots or branches during repotting.
- A new pot: Choose one slightly larger than your Rhododendron’s current pot to accommodate its growing root system.
- Potting soil: Select a high-quality acidic soil mix suitable for acid-loving plants like Rhododendrons.
- Tarp or dropcloth: Keep your workspace clean while transferring soil and repotting your plant.
- Gloves: Use sturdy gardening gloves to protect your hands from sharp leaves and stems during repotting.
- Watering can or hose with gentle spray setting: For watering your plant before and after repotting.
- Trowel or shovel: Useful for filling the soil around the root ball in the new pot.
- Drainage material (e.g., gravel, perlite, broken terracotta pieces): Necessary for ensuring proper drainage at the bottom of your new pot.
Choosing The Right Pot And Soil
One of the most important factors to consider when repotting your rhododendron plant is selecting the right pot and soil.
Choosing a pot slightly larger than the current one is crucial for proper drainage and room for growth.
A pot that is too big can cause excess moisture retention, leading to root rot and other diseases.
Using a high-quality, well-draining soil mix rich in organic matter and suitable for acid-loving plants like rhododendrons.
Avoid using garden soil or compost alone, as they can become compacted and retain too much moisture, leading to poor growth and decreased vitality.
Preparing The New Pot And Soil
Before repotting your rhododendron plant, choosing the right size container and using high-quality potting soil is essential.
The new pot should have good drainage holes to prevent waterlogging, which can lead to root rot.
You can fill the bottom of the pot with stones or gravel to improve drainage.
Mix equal parts of peat moss, acid-loving plant soil, and a slow-release fertilizer for the best soil composition for long-lasting nourishment.
Avoid using ordinary garden soil as it may contain harmful pests or diseases that can damage your rhododendron plant.
Repotting Your Rhododendron Plant Step-by-Step
To ensure your rhododendron plant grows and stays healthy, follow these simple steps for repotting.
Removing The Plant From Its Current Pot
Before removing your Rhododendron from its current pot, it’s essential to water the plant thoroughly.
This will help keep the root ball intact and prevent damage during repotting.
Next, slowly and carefully pull out the plant from its old container.
If you notice roots winding around in circles at this stage, use a sharp pruning shear to remove any excess or damaged ones.
Pruning The Roots
Pruning the roots is essential when repotting a rhododendron plant, as it promotes healthy growth and prevents root-bound plants.
Remove any dead or damaged roots using sharp, clean pruning shears.
Then, cut any circling or tangled roots to encourage new growth in different directions.
It’s also crucial to ensure that your Rhododendron has enough space in its new container and doesn’t become restricted by its pot.
Pruning the roots can help prevent this and allow room for fresh soil with nutrients to support its future growth.
Transferring To The New Pot
After pruning the roots, transferring your rhododendron plant into its new pot is time.
Gently lift the plant by carefully holding onto its stem while supporting the root ball underneath with your fingers.
Slide the root system into the center of the new pot and ensure that the place where the stem meets the roots is about one inch from the top of the container.
It’s important to choose a pot size that offers enough room for root growth but not so much that it allows excessive soil moisture retention, leading to waterlogging or disease development.
Also, make sure you’re placing your repotted Rhododendron plant in an area where it will get sufficient light exposure based on its species’ requirements – some prefer full sun.
In contrast, others thrive best in partial shade environments.
Watering And Post-Repotting Care
After repotting your rhododendron plant, it is essential to water it thoroughly.
This helps settle the soil around the roots and ensures the plant gets enough moisture to thrive in its new home.
However, be careful not to overwater, which may cause root rot.
Post-repotting care also involves providing proper drainage for your plant.
Avoid allowing excess water to accumulate at the bottom of the pot by ensuring drainage holes are in place.
Additionally, add a layer of organic mulch around the base of your Rhododendron plant for moisture retention and weed control.
Remember to monitor your plants’ progress closely for any signs of stress or problems with pests or diseases by checking leaves regularly for changes in color or texture.
Tips For Successful Rhododendron Repotting
To keep your plant healthy, provide adequate drainage to avoid excess moisture buildup and overwatering.
Keep an eye on your plant’s growth and provide necessary nutrients. Protect it from frost and other harmful elements.
Consider using organic mulch like pine bark or compost to provide additional nutrients to the soil.
Providing Proper Drainage
Proper drainage is crucial to the health of your rhododendron plant, both during and after the repotting process.
Excess water can accumulate in the soil without adequate drainage, leading to root rot and other diseases.
Choose a pot with several drainage holes at the bottom to ensure proper drainage.
When watering your plant, be sure not to overwater it, as this can lead to standing water in the container.
Additionally, ensure that any excess water drains away from the pot quickly.
If you notice slow or no draining from your container after watering your plant, adjust accordingly by changing where and how often you water it.
Avoiding Overwatering And Underfertilizing
Overwatering and underfertilizing are two common mistakes to avoid when repotting your rhododendron plants.
Overwatering can lead to root rot and suffocation of the plant’s roots, preventing it from taking up vital nutrients.
To avoid these issues, only water when the soil is dry to the touch, about an inch below the surface.
You should also use a balanced fertilizer formulated explicitly for acid-loving plants like rhododendrons and azaleas, following directions carefully and not over-applying.
Additionally, adding compost or decomposed pine bark to your soil mix can gradually provide nutrients while improving drainage.
Protecting From Frost And Other Elements
Rhododendron plants are sensitive to sudden temperature changes and exposure to direct sunlight, especially during the winter season.
To protect your rhododendrons from frost and other elements, choosing an appropriate location for repotting where they can receive partial shade and avoid direct sunlight is essential.
It is also advisable to avoid repotting during extremely cold weather as this can cause transplant shock for your rhododendron plant.
Instead, wait until the early spring when temperatures are relatively stable and then take all necessary steps to insulate the roots with a layer of organic mulch or straw.
How To Monitor Your Plant’s Progress
Monitoring your rhododendron plant’s progress after repotting is essential to ensure its successful transition into the new environment.
One of the first signs that your plant is adjusting well is the appearance of new growth and healthy leaves.
During this period, keep a close eye on the soil moisture level and avoid overwatering or underwatering the plant.
You can use a moisture meter or check soil dryness by inserting your finger up to an inch deep in the soil.
Additionally, monitor any leaf color or texture changes as they could indicate nutrient deficiencies or pest infestations.
Remember to provide adequate light exposure and maintain proper temperature levels for optimal growth and development.
Common Mistakes To Avoid
When repotting your rhododendron plant, it’s important to avoid these common mistakes:
- Using the wrong type of soil: Rhododendrons require acidic soil with a pH level between 4.5 and 6.0. Using too alkaline soil can lead to nutrient deficiencies and stunted growth.
- Repotting too often or not often enough: Repotting too frequently can damage the plant’s roots, while not repotting often enough can stunt growth and limit the plant’s potential.
- Fertilizing immediately after repotting: Newly repotted plants should not be fertilized immediately, as it can cause root burn and stress the plant.
- Overwatering or underwatering: Proper watering techniques are crucial when repotting rhododendrons, as overwatering or underwatering can lead to root rot or other issues.
- Failing to provide proper drainage: Rhododendrons require well-draining soil, so be sure to choose a pot with drainage holes and provide good drainage material at the bottom of the new pot.
- Ignoring signs of stress or disease: Keep an eye out for any signs of stress or disease in your newly repotted Rhododendron, such as yellowing leaves or wilting branches, and take action accordingly.
Final Thoughts
Repotting your rhododendron plant can be a challenging but rewarding process.
With the right tools, materials, and knowledge, you can successfully transfer your plant to a new pot and soil with minimal stress or shock.
Remember to choose the appropriate time for repotting, select the proper pot and soil mix, provide good drainage, and avoid overwatering.

