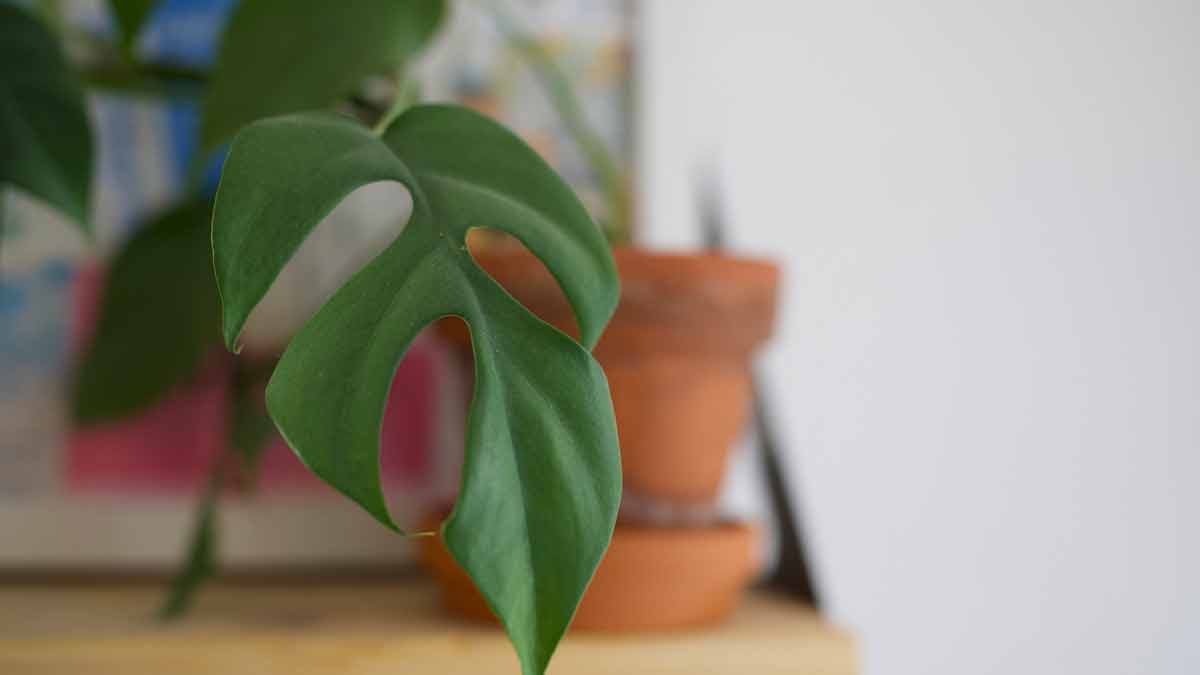
To propagate a Monstera Minima, take a 15-20 cm stem cutting with a leaf node, remove leaves under the water line if propagating in water, put in water or soil, and keep it moist and warm, humid environment. Roots and new growth should appear in a few weeks.
Are you seeking an easy and rewarding way to propagate your Monstera Minima, the Rhaphidophora tetrasperma?
Then you’ve come to the right place!
Propagating Monstera Minima, commonly known as the ‘Mini Monstera’, is a simple process that requires minimal effort and can be done throughout the year.
In this guide, we’ll explain exactly how it’s done so you can succeed with your propagation efforts.
We’ll cover everything from the pros and cons of water, soil, and division propagation to best practices for success.
Monstera Minima Propagation Methods
Propagating a Mini Monstera is an exciting way to increase your collection of houseplants.
There are three main methods for propagating this plant: water propagation, soil propagation, and division.
Each method has its own pros and cons, so it’s important to understand the differences before you begin.
Water Propagation
Water propagation is one of the most popular methods for propagating Mini Monstera plants.
It’s easy to do and requires no special equipment or supplies.
The most significant advantage of water propagation is that it’s fast and easy to do.
You don’t need special equipment or supplies, just a jar of water and patience!
The downside is that keeping the water clean and free from bacteria or fungus can be difficult, which can cause root rot or other problems for your plant.
Additionally, once you transfer your cutting into soil, you may find that some roots don’t survive the transition from water to the soil.
Soil Propagation
Soil propagation is another popular method for propagating Rhaphidophora tetrasperma.
The biggest advantage of soil propagation is that it gives your cuttings more stability while growing new roots since they are not suspended in liquid like when using water propagation.
This makes them less likely to suffer from root rot or other issues due to poor drainage or overwatering.
Additionally, once you transfer your cuttings into soil, there is less chance of losing any newly formed roots during the transition from water to soil than when using water propagation alone.
The downside is that it takes longer than water propagation since you must wait for new roots to form before transferring them into the soil (usually several weeks).
Additionally, if you don’t use an airy mixture such as sphagnum moss or perlite mixed with peat moss or vermiculite, your cuttings may not get enough oxygen, leading to root rot or other issues down the line.
Propagation by Division
Propagation by division is another excellent option for propagating Monstera Minima. But it requires more effort than either of the two methods mentioned above.
The biggest advantage of this method is that it allows you to quickly increase your collection without waiting for new cuttings taken from existing plants to grow new roots before transplanting them into their final potting containers (usually takes several weeks).
Additionally, since you are splitting up existing Monstera plants rather than taking cuttings from them, there is less chance of any new plants suffering from root rot due to poor drainage.
The downside, however, is that this method requires more effort than either of those methods since you must physically divide up existing plants rather than take cuttings from them.
You should also ensure that each division contains at least one leaf node. Otherwise, those divisions will only survive once transplanted into their final potting containers.
How To Propagate Monstera Minima in Water
Rhaphidophora tetrasperma is an excellent Monstera plant for propagating in water. It’s an easy process that requires minimal materials and time.
Materials Required
To propagate Monstera plants in water, you’ll need a few items:
- A sharp knife or pair of scissors
- A clean glass jar or vase
- Distilled or filtered water
- A healthy stem cutting from a mature plant
- Rooting hormone (optional)
- Potting soil
Step-by-Step Guide
Now that you have all the necessary materials let’s get started!
Here are the steps for propagating Monstera Minima in water:
- Start by taking a healthy stem cutting from a mature plant. Make sure the cutting has at least one leaf node with some aerial roots attached. Cut off a 15 – 20 cm long shoot from the main Monstera plant using a sharp knife or scissors.
- Place the cutting into a clean glass jar or vase filled with distilled or filtered water. If desired, add a few drops of rooting hormone to help encourage root growth.
- Place the jar in an area with indirect sunlight and change out the water every few days to keep it fresh and free of bacteria and fungus growth.
- After about two weeks, roots should start to form on your cutting, and it will be ready for potting up into soil! When potting your new plantlets, use an airy soil mixture designed explicitly for aroids like Monstera Minima.
- Once potted up, continue caring for your new plants like any Rhaphidophora tetrasperma plant – give them bright indirect light and keep their soil moist but not soggy at all times!
And there you have it – propagating Monstera Minima in water is quite simple!
With just a few materials and patience, you can quickly increase your collection of these beautiful plants without breaking the bank!
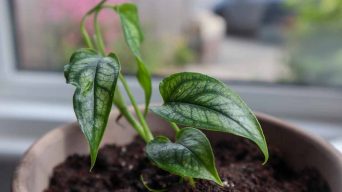
How To Propagate Monstera Minima in Soil
Propagating Monstera Minima in soil is a great way to increase your plant collection and create a lush, tropical look.
It’s not as difficult as it may seem. With the suitable materials and step-by-step guide, you can propagate your Rhaphidophora tetrasperma in no time!
Materials Required
To propagate Monstera Minima in soil, you will need:
- A sharp pair of scissors or pruners
- A potting mix that is well draining (such as a cactus mix or an airy aroid mixture)
- A pot with drainage holes
- A rooting hormone (optional)
- Watering can or spray bottle
Step-by-Step Guide
To propagate Monstera Minima in soil, follow these steps:
- Start by taking a healthy stem cutting from a mature plant. Ensure the cutting has at least one leaf node with some aerial roots attached. Cut off a 15 – 20 cm long shoot.
- Start by taking a cutting from the mother plant. Look for healthy stems with at least two nodes (the part of the stem where leaves emerge). Cut just below the node using sharp scissors or pruners. Make sure to leave at least two leaves on the cutting. If desired, dip the cut end of the stem into a rooting hormone before planting.
- Fill your pot with a well-draining potting mix and make a hole for the cutting. Place the cutting into the hole so that it is standing upright, making sure that at least one node is covered by soil. Gently press down around the base of the cutting to secure it in place.
- Water your newly planted cutting until water runs out of the drainage holes at the bottom of your pot. Keep soil moist but not soggy while waiting for roots to form (usually takes about 2 weeks). You can use a spray bottle or watering can for this step.
- Once roots have formed, you can begin fertilizing your new Monstera plant every few weeks with an all purpose liquid fertilizer diluted to half strength during its growing season (spring through fall). During winter, reduce the fertilizing frequency to once every month or two months, depending on how active growth appears during this period.
- As your Mini Monstera grows more extensive, you may need to repot it into a larger container with fresh potting mix every year or two, depending on how quickly it’s growing and how much root space it has available in its current container size.
With these steps and materials, you should have no problem propagating the mini monstera in soil!
How To Propagate Monstera Minima Using the Division Method
Propagating Monstera Minima plants by division involve separating the plant into multiple parts and propagating each separately.
This method is a great way to increase your collection of these beautiful plants and can be done in just a few simple steps.
Materials Required
To propagate the Monstera Minima using division, you will need the following:
- A mature Rhaphidophora tetrasperma plant
- A sharp knife or scissors
- Potting soil
- A pot or container for each new plant
- Watering can or spray bottle
- Rooting hormone (optional)
Step-by-Step Guide
To propagate Monstera Minima through division, you will need to follow these steps:
- Begin by selecting a mature Monstera Minima plant that has several stems. This will make it easier to divide the plant into multiple pieces.
- Carefully remove the plant from its pot and inspect the roots. If they are tightly bound together, use a sharp knife or scissors to separate them into two or more sections carefully. Make sure each section has at least one stem and some roots attached.
- If desired, dip the cut end of each section into rooting hormone before planting it in its own pot filled with moistened potting soil. This will help encourage faster root growth and healthier plants overall.
- Place each section into its pot and lightly press down on the soil around it so it’s firmly planted. Water each area thoroughly until water begins to drain out of the bottom of the pot, then discard any excess water that collects in the saucer beneath it.
- Place your newly propagated Mini Monstera plants in bright indirect light and keep them evenly moist but not soggy. At the same time, they become established over the next few weeks or months (depending on how quickly they take root). Once they’ve grown some roots and look healthy, you can start fertilizing them every other month with an all purpose liquid fertilizer diluted to half strength according to package directions.
Although it takes patience and care, propagation by division is an effective way to increase your Monstera collection!
Tips for Propagating Mini Monstera
When propagating Mini Monstera, there are some tips to keep in mind:
- Ensure you have at least two nodes on your Monstera cutting when taking it from the parent plant – this will ensure successful propagation!
- If propagating in water, change the water every few days to stay fresh and free from bacteria buildup.
- If propagating in soil, go for an airy aroid mixture such as one made up of peat moss, perlite, and vermiculite – this will give your mini monstera plenty of room to grow!
- When planting your cuttings, ensure they are secure but not too tight – this will help them establish better roots!
- Keep an eye on your mini monstera after it has been propagated to ensure they get enough light, water, and nutrients.
These simple tips will help you successfully propagate the Rhaphidophora tetrasperma with ease!
How Long Does It Take To Propagate Mini Monstera?
Mini Monstera, or Rhaphidophora tetrasperma, is a fast-growing plant that is relatively easy to propagate.
This makes it an ideal choice for those looking to add a bit of greenery to their home without waiting too long for the results.
But just how long does it take to propagate Mini Monstera plants?
The answer depends on several factors, including the type of propagation method you use and the time of year.
Generally speaking, propagating Rhaphidophora tetrasperma in water takes anywhere from two weeks to two months, while propagating in soil can take up to three months.
However, it’s important to remember that every situation is different, and these timelines may vary depending on the conditions of your home or garden.
The Best Time To Propagate Rhaphidophora Tetrasperma
Timing is key if you’re looking for even faster results when propagating Mini Monstera!
The best time to propagate this plant is between May and June when temperatures are warmer and there’s plenty of light available for photosynthesis.
During this period, cuttings will root quickly so that you can pot them up sooner rather than later!
Caring for Newly Propagated Monstera Minima
Propagating Monstera Minima is a great way to add more beautiful plants to your home.
But once you’ve propagated them, knowing how to care for your Rhaphidophora tetrasperma is essential.
Here are some tips for keeping your newly propagated Mini Monstera happy and healthy:
Transferring to a Larger Pot
Once your Monstera Minima plant has grown enough roots and is ready to be transferred into a larger pot, you should keep a few things in mind.
Choose a pot slightly larger than your Mini Monstera initially propagated in. This will give the plant plenty of room for growth.
Secondly, use a well-draining potting mix that contains peat moss or coco coir. This will help keep the soil moist without becoming waterlogged.
Finally, when transferring your Rhaphidophora tetrasperma from its original container into its new home, handle it gently and do not disturb any of the roots too much.
Proper Watering
When watering your newly propagated Monstera Minima, it’s important not to overwater it, as this can lead to root rot.
The best way to tell if your plant needs water is by feeling the top inch or two of soil with your finger; if it feels dry, it’s time for a drink!
Generally speaking, Rhaphidophora tetrasperma likes its soil kept moist but not soggy, so aim for about once every week or two, depending on how quickly the soil dries out.
It’s also important to never let the soil completely dry out, as this can cause stress and damage to the plant.
Adequate Lighting
Monstera Minima plants do best in bright indirect light but can also tolerate low light conditions.
If your Rhaphidophora tetrasperma is not growing as quickly as it should be or the Monstera leaves are starting to yellow, you may need to increase its light exposure.
Moving it closer to an east-facing window or adding an artificial grow light nearby.
Just be careful not to place it in direct sunlight, which can cause sunburn on the Monstera leaves!
Temperature Requirements
Monstera Minima plants prefer temperatures between 55°F and 85°F (12°C – 29°C).
If temperatures drop below 55°F (12°C), you may consider bringing your plant indoors during winter or providing additional heat with an electric or space heater nearby.
On the other hand, if temperatures rise above 85°F (29°C), ensure plenty of air circulation around your plant and regularly mist it with water from a spray bottle to keep humidity levels high. This will help prevent leaf scorch from occurring due to excessive heat exposure.
Final Thoughts
Propagating your Rhaphidophora tetrasperma can be a fun and rewarding experience.
Depending on your chosen method, it can take a few weeks to several months for your new babies to grow.
Water propagation is usually the fastest and can be done with minimal tools and supplies. In contrast, soil propagation is slower but creates larger plants more quickly.
Propagating by division requires careful attention. The parent plant must be carefully and correctly split into two or more pieces.
Regardless of your chosen method, it is essential to remember to provide ample sunlight, water, and proper nutrition for your new Monstera Minima plants.
With patience, a positive attitude, and some luck, your Mini Monstera will have plenty of new little plants in no time!
Good luck!
Related Content
 Repotting Haworthia Succulents: Timing & Steps for Success
 Monkey Tail Cactus Care and Propagation: A Guide to Succulent Success
 Monstera Siltepecana Care: The Silver Monstera Growing Guide
 Echeveria Minima Care and Propagation (A Complete Guide)
 Monstera Adansonii Propagation: How to Easily Grow Your Own
 Mastering Monstera Indoor Care: A Complete Guide